At some or the other point in time we have to select more than one file/folder in Windows to accomplish a task. To do so there are multiple ways available in Windows as listed below:
To select a group of items- click the first item then press and hold down the Shift key, and then click the last item.
To select all the items - hold down the Ctrl key and then press A. OR you can even drag the mouse pointer to create a selection around the outside of all the items that you want to select.
Above are pretty known ways of selecting items and almost all of us would be aware of them. So what’s new? Today, I will tell you a little-known but very efficient way to select files and folders in Windows. Do note that this applies to Windows 7 and Windows 8 only. The so-called feature is check box feature which is disabled by default. So let’s see how to enable and use it to increase our productivity.
How To Enable Check boxe feature In Windows 7/8
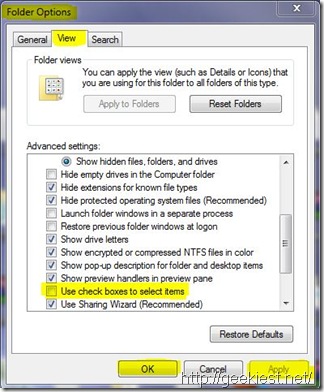
1. Open "Control Panel" first, and then click "Folder Options".
2. In "Folder Options" window, click/tap on the View tab.
3. Now scroll down a bit and check the box beside "Use check boxes to select items", as shown below.

4. When you are finished click Apply, then click OK to save changes.
So, in just 4-simple steps we were able to enable check box feature. Simple- Yes.
Wise Words:
By default, checkboxes won’t show up and remain hidden until you hover your mouse or click on a file/folder. Once selected you can perform common operations on the checked file/folder such as copy, delete, rename, and print. Simply right-click the selected item(s) and then click the appropriate operation you want to perform.
Below is a snap of checkbox usage.
 .
.
Do let us know (through comments) if this How-To helped you.