In this guide we will write a fix to a common problem which occurs many a times with many users. The issue that happens is that when you reboot your linux distro it keeps forgetting your screen-resolution and resets to the default 800x600 or other resolutions which may not be suitable for you. In Linux the low level graphics is handled by something known as the X server which is the X11 graphics management system, and sometimes the configuration does not get saved properly and X11 reverts to the display mode it feels is the best for your monitor setup although you may want something different. Many Windows users get perplexed by this but there is a simple solution to this issue.
The solution is to manually force a resolution by editing the xorg.conf file which controls the X11 display system. Please note to take care while using the commands also take a note of them or click a picture as we will be disabling your graphical window manager for sometime while doing this. Also I have personally tried and tested this guide in Ubuntu/Debian/Linux-Mint but still please take care while typing and using them.
So lets begin. First we need to generate the xorg.conf file. In earlier versions of linux this file was needed for X11 to function and was present by default. In newer versions the conf file is not there and X11 nowadays auto-senses the monitor's settings. But still now if you use a xorg.conf file X11 will use that to display over-riding the defaults.
So lets proceed and read the whole guide before jumping in The first step is generating the xorg.conf file.
1. First switch to the console mode by pressing Alt+Ctrl+F1 keys together.
You will be dropped into a black screen, and now follow on.
2. Kill the X server, ie your graphic environment will shutdown. Type this command in the console.
sudo service lightdm stop
Please note you will be asked for your root password for this operation.
3. Generate the config file: sudo X -configure. Note:- Here the X is a capital X.
4. Rename and move the generated file: sudo mv xorg.conf.new /etc/X11/xorg.conf
5. Restart and return to your GUI: sudo start lightdm
Now in this second part we will edit the generated xorg.conf file.
Now the first part of generating the file is over. Now we need to edit this file to force our resolution to be used. To do so you need to run your file explorer with root privileges. Be careful now and dont mess with the files if you dont know what you are doing.
Another thing you need to check is whether your monitor runs on 16bit or 24bit or 32bit graphics. These bits generally signify the colour depth. 24Bit means 1million colours.
Most old CRT monitors run on 16bit, and some newer LCD/LED on 32bit. Most LCD/LEDs use 24bit.
To check your current depth settings open a terminal and type: xwininfo -root | grep Depth:
Hit Enter and see the result. Keep this value in your mind as you will need it.
Now open the terminal and type sudo nautilus or sudo thunar whichever is your file-manager call it up in root mode.
Now open /etc/X11/xorg.conf in your favourite editor. By default on Gnome it will be gedit.
In this file find Section "Screen" and in it find the first occurance of SubSection "Display"
If not already there just before it add DefaultDepth 16. Replace 16 with the depth you found with the xwin command.
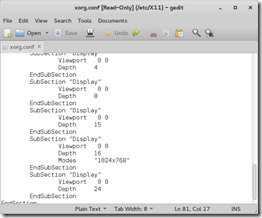
Now navigate to the SubSection "Display" in which your corresponding depth is mentioned. Use the screen-shot to help guide you. There are many subsection displays corresponding to your depth. Find the one in which Depth is mentioned as the default depth you added a moment back.
Now in it after the depth add Modes "1024x768" replace 1024x768 with whatever screen-resolution you want.
That's it save this file and restart your computer. You should see that right from the login screen everything loads at the given resolution. Please note that before adding a resolution make sure it is supported by your monitor else don’t add it.

You can run xrandr command in the terminal to figure out the list of display modes. Also do not add a refresh rate along with your screen resolution else it wont work. The Xorg wiki’s do have an issue where they suggest you to add a refresh rate but don't add it. Allow Xorg to auto-detect it.
If you need any help please don’t hesitate to contact via comments. For multi-monitor setup it is quite messy. Just keep in mind for each monitor the section screen will be mentioned with its corresponding settings. The first one which mentions VGA 0 is the primary, VGA 1 is the secondary, VGA 2 tertiary and so on. So edit the corresponding parts in such cases.
Finally a small disclaimer, be careful, if you mess-up, its on your own head and we are not responsible.